Pages

search

Custom Search

AdsforIndians

DISCLAIMER: INFORMATION FURNISHED IN THE BLOG IS COLLECTED FROM VARIOUS SITES. THE AUTHOR DID NOT UPLOAD ANY OF THEM. THIS BLOG DOES NOT HOST ANY FILES ON ITS SERVER. ALL COPY RIGHTS ARE RESTED WITH RESPECTIVE AUTHORS.PERSON DOWNLOADING ANY CONTENT FROM THIS SITE SHALL NOT BE BEAR THE RESPONSIBILITY.WE HIGHLY RECOMMEND TO BUY ORIGINAL .

AdsforIndians

Wednesday, August 8, 2012

09-August-2012 Nod32 Username Password

Username: TRIAL-70619416


Password: dhp62hrv5c


Username: TRIAL-70619414

Password: 7tpa6ne74h


Username: TRIAL-70619435

Password: dkkxkd8aas


Username: TRIAL-70619433

Password: 7xk4rjvk82


Username: TRIAL-70619452

Password: cjn6fc5f43


Username: TRIAL-70619446

Password: 8t83u4fnjf


Username: TRIAL-70620420

Password: 8s2mt2ppue


Username: TRIAL-70620416

Password: tf2t6b4bsr


Username: TRIAL-70620417

Password: nxrj2dds56


Username: TRIAL-70620423

Password: sm7nmm3kmn


Username: TRIAL-70620457

Password: v7dxad3nav


Username: TRIAL-70620447

Password: 3xru2nsa2a


Username: TRIAL-70620453

Password: 26xpf2rks8

ENVIRONMENT VARIABLE and Port Value Problem Solution

Hi Friends,


Here i am getting 2 or 3 mails daily regarding the problem of ENVIRONMENT VARIABLE and port value in UG NX Series (Unigraphics).


If any of you got errors listed below, than you are at right place and found solution.


Errors:


log file in UGSLicensing saying that it could not open the port listed in the license file.

NX LICENSE ERROR - NX REQUIRED THE ENVIRONMENT VARIABLE ugs_LICENSE_SERVER to be configured properly.

The TCP port number in the license, 28000, is already in use.

FLEXnet Licensing error:-125,147


so friends there is two solutions, one for UG NX 1-4 and Second for UG NX 5-6,


For UG NX 1-4 :


right click on My Computer ->Properties-> advance tab -> environment variables.

click on new tab


in variable name write ------UGII_LICENSE_FILE


in variable values write -----27000@COMPUTER Name


For UG NX 5-6 :


right click on My Computer ->Properties-> advance tab -> environment variables.

click on new tab


in variable name write ------UGS_LICENSE_SERVER


in variable values write -----28000@COMPUTER Name


See the print screen below :


License Server not Found Error Solution for UG NX Series

Hello Dear All,


Again here i got mails from the blog readers having problems in installation of Unigraphics,Ansys,Pro Engineer etc.


During installation we need to configure License File via. License server installed in our Personal Computer(PC) or Laptop.


I have already posted the step by step procedure for License file Configuration here.


But either by user mistake or via improper method some of users will get the errors, that License Server not Found during configuration via lmtools.exe


So here I am posting solution for that, open lmtools.exe that will show you the following image.


At step (A) Here in this image the UGS License Server is running properly (B)


if in yours this is not, then go to step (C) and create and save a new license server.

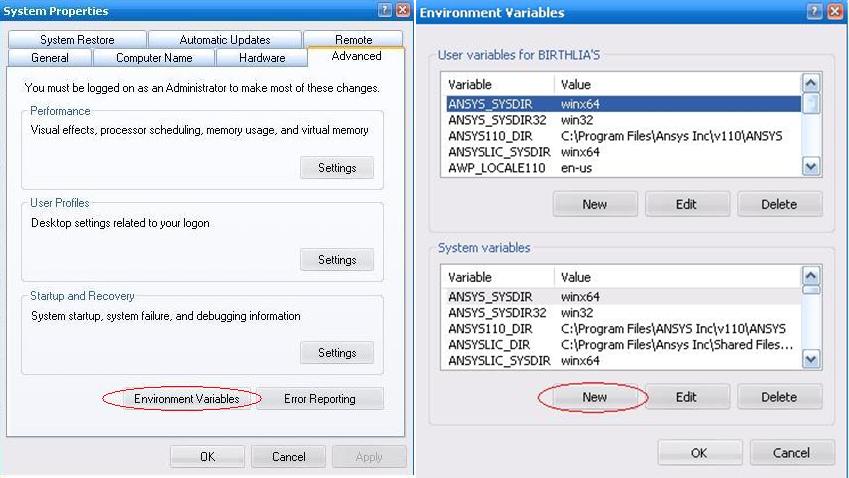
1. Here you will see the Service Name: UGS License Server (ugslmd)


2. Click on browse and select the file lmgrd.exe in your PC : C:\Program Files\UGS\UGSLicensing\lmgrd.exe


3. Click on browse and select the license file in your PC : C:\Program Files\UGS\UGSLicensing\ugs2.lic


4. Click on browse and select the debug log file in your PC : C:\Program Files\UGS\UGSLicensing\ugslicensing.log


If debug log file is not there then create a text document and rename it with ugslicensing.log


5. Enable (Check mark) Start server at Power Up.


6. Use services same as shown.


7. Click Save Service.Then restart the Computer and run lmtools.exe, check the status at (B) you will get UGS License Server.


Then go to my other post and configure license file via this UGS License Server.


For configuration in UG NX5 and UG NX6 click here


For configuration in UG NX4 to NX1 click here


Now enjoy and You can use the same procedure in Ansys or Pro Engineer or any other software which is using Lmtools license.

UG license server error in UG NX5 and NX6

Hi Friends,


One of my friends got this problem in UG license server, and asked me solution.


I am trying to install UGnx5 I keep getting the error can you help me?


Initialization error-

NX License Error: License Server node is down or not responding [-96]


What can I do? I set my environment variables to


variable name UGII_LICENSE_FILE

variable value 27000@dgkw5f64


this is in my peform enquiry


[Detecting lmgrd processes...]

License server status: 27000@DGKW5F64.

License file(s) on DGWW8F61.: C:\Program Files\UGS\NX 4.0\UGFLEXLM\ugnx4.lic:


DGWW8F61.: license server UP (MASTER) v10.8


Vendor daemon status (on DGKW5F64.):


uglmd: UP v10.


this also


FLEXnet Licensing error:-125,147


So friend here is solution for this.......

use env. variable like this in UG NX5 and NX6. Because the port value is changed 28000 from 27000.


variable name : UGII_LICENSE_SERVER


variable value : 28000@Computer Name


and rest license cofiguration process is same as in previous versions of UG.

For configuration process check my post


UG-license-installation-error-solution

Unigraphics Hot keys to increase user performance

Hi dear all,


Sometimes you can work faster with your personal computer or laptop key-board then the mouse if you know the short cut keys. Same as in the other programs CAD software's also have their hot keys. Here are the hot keys or you can say key-board short cut keys of unigraphics (UG). Hope that this will help a lot to improve your software understanding and working.


Edit-Undo List-Invalid menu entry Ctrl+Z UG_EDIT_UNDO

Edit-Cut Ctrl+X UG_EDIT_CUT

Edit-Copy Ctrl+C UG_EDIT_COPY

Edit-Paste Ctrl+V UG_EDIT_PASTE

Edit-Delete... Ctrl+D UG_EDIT_DELETE

Edit-Selection-Top Selection Priority - Feature F UG_SEL_FEATURE_PRIORITY

Edit-Selection-Top Selection Priority - Face G UG_SEL_FACE_PRIORITY

Edit-Selection-Top Selection Priority - Body B UG_SEL_BODY_PRIORITY

Edit-Selection-Top Selection Priority - Edge E UG_SEL_EDGE_PRIORITY

Edit-Selection-Top Selection Priority - Component C UG_SEL_COMPONENT_PRIORITY

Edit-Selection-Select All Ctrl+A UG_SEL_SELECT_ALL

Edit-Blank-Blank... Ctrl+B UG_EDIT_BLANK_SELECTED

Edit-Blank-Reverse Blank All Ctrl+Shift+B UG_EDIT_REVERSE_BLANK_ALL

Edit-Blank-Unblank Selected... Ctrl+Shift+K UG_EDIT_UNBLANK_SELECTED

Edit-Blank-Unblank All of Part Ctrl+Shift+U UG_EDIT_UNBLANK_ALL_OF_PART

Edit-Transform... Ctrl+T UG_EDIT_TRANSFORM

Edit-Object Display... Ctrl+J UG_EDIT_OBJECT_DISPLAY

View-Operation-Zoom... Ctrl+Shift+Z UG_VIEW_ZOOM

View-Operation-Rotate... Ctrl+R UG_VIEW_ROTATE

View-Operation-Section... Ctrl+H UG_VIEW_SECTIONING

View-Layout-New... Ctrl+Shift+N UG_LAYOUT_NEW

View-Layout-Open... Ctrl+Shift+O UG_LAYOUT_OPEN

View-Layout-Fit All Views Ctrl+Shift+F UG_LAYOUT_FIT_ALL_VIEWS

View-Visualization-High Quality Image Ctrl+Shift+H UG_VIEW_HIGH_QUALITY_IMAGE

View-Information Window F4 UG_VIEW_INFO_WINDOW

View-Current Dialog F3 UG_VIEW_CURRENT_DIALOG

View-Reset Orientation Ctrl+F8 UG_VIEW_RESET_ORIENTATION

Format-Layer Settings... Ctrl+L UG_LAYER_SETTINGS

Format-Visible in View... Ctrl+Shift+V UG_LAYER_VIEW

Format-WCS-Display W UG_WCS_DISPLAY

File-New... Ctrl+N UG_FILE_NEW

File-Open... Ctrl+O UG_FILE_OPEN

File-Save Ctrl+S UG_FILE_SAVE_PART

File-Save As... Ctrl+Shift+A UG_FILE_SAVE_AS

File-Plot... Ctrl+P UG_FILE_PLOT

File-Execute-Grip... Ctrl+G UG_FILE_RUN_GRIP

File-Execute-Debug Grip... Ctrl+Shift+G UG_FILE_RUN_GRIP_DEBUG

File-Execute-NX Open... Ctrl+U UG_FILE_RUN_UFUN

Tools-Expression... Ctrl+E UG_INSERT_DLEXPRESSION

Tools-Journal-Play... Alt+F8 UG_JOURNAL_PLAY

Tools-Journal-Edit Alt+F11 UG_JOURNAL_EDIT

Tools-Macro-Start Record... Ctrl+Shift+R UG_MACRO_RECORD

Tools-Macro-Playback... Ctrl+Shift+P UG_MACRO_PLAYBACK

Tools-Macro-Step... Ctrl+Shift+S UG_MACRO_STEP

Preferences-Object... Ctrl+Shift+J UG_PREFERENCES_OBJECT

Preferences-Selection... Ctrl+Shift+T UG_PREFERENCES_SELECTION

Information-Object... Ctrl+I UG_INFO_OBJECT

Analysis-Curve-Refresh Curvature Graphs Ctrl+Shift+C UG_INFO_MB_SHOW_GRAPHS

Application-Modeling... Ctrl+M UG_APP_MODELING

Application-Shape Studio... Ctrl+Alt+S UG_APP_STUDIO

Application-Drafting... Ctrl+Shift+D UG_APP_DRAFTING

Application-Manufacturing... Ctrl+Alt+M UG_APP_MANUFACTURING

Application-Sheet Metal-NX Sheet Metal Ctrl+Alt+N UG_APP_SBSM

Application-Gateway... Ctrl+W UG_APP_GATEWAY

Help-On Context... F1 UG_HELP_ON_CONTEXT


If you have any suggestion or feedback, then let us know.

Vibration Simulation Using MATLAB and ANSYS

Transfer function form, zpk, state space, modal, and state space modal forms. For someone learning dynamics for the first time or for engineers who use the tools infrequently, the options available for constructing and representing dynamic mechanical models can be daunting. It is important to find a way to put them all in perspective and have them available for quick reference. It is also important to have a strong understanding of modal analysis, from which the total response of a system can be constructed. Finally, it helps to know how to take the results of large dynamic finite element models and build small MATLAB state space models. Vibration Simulation Using MATLAB and ANSYS answers all those needs. Using a three degree-of-freedom (DOF) system as a unifying theme, it presents all the methods in one book. Each chapter provides the background theory to support its example, and each chapter contains both a closed form solution to the problem-shown in its entirety-and detailed MATLAB code for solving the problem. Bridging the gap between introductory vibration courses and the techniques used in actual practice, Vibration Simulation Using MATLAB and ANSYS builds the foundation that allows you to simulate your own real-life problems. Features Demonstrates how to solve real problems, covering the vibration of systems from single DOF to finite element models with thousands of DOF Illustrates the differences and similarities between different models by tracking a single example throughout the book Includes the complete, closed-form solution and the MATLAB code used to solve each problem Shows explicitly how to take the results of a realistic ANSYS finite element model and develop a small MATLAB state-space model Provides a solid grounding in how individual modes of vibration combine for overall system response


Download link:Vibration Simulation Using MATLAB and ANSYS.rar

Install UG NX 6 x32 bit in Windows 7 x64 bit.(Step by Step Guide)

From a long time the readers of CAD Help Center are still searching the solution for installation process of Unigraphics (UG NX 5 or NX 6) in Windows Vista (x32 or x64 bit).


After a long time now I have got a chance to try to install and see the errors while installation or running the UG NX 6 in Windows 7 x64 bit. I was unable to get Windows Vista to try out the UG NX 5 or NX 6, but I have seen that the Windows 7 is up-gradation in Windows Vista.


This is not the final version of Windows 7 but I have got a Genuine copy of this Windows 7 Ultimate x64(Check the screen shot).Can say best ever operating system till today. This is ultra fast to work like copy, paste, installation or uninstallation of a programs,Graphics and other features.

I hope that if the UG NX 6 is running in Windows 7, it will also work in Vista in both.(32 or 64 bit).And also UG NX 5 will work like this in Vista.


So here i am writing the procedure of how I install UG NX 6 and configured license file and others files.


Mount or Open the Image in Image Drive. (like Nero or Ultra ISO)

Auto Play will start Installation Automatically.


If Auto Play will not work then open the Image Drive and Double click on Launch file.

First of all install the License Server.(This is same as in my previous Post : See here )

Note that in all versions of x64 bit Windows, if the software you are installing is x32 bit, this will be installed by default in Program files (x86) like. (C:\Program Files (x86)\UGS\UGSLicensing\)

After finishing the installation of License Server click on Install NXSelect English(United States) as setup Language or select as of your Windows Language.


Installation will begin and ask you for Setup Type select Typical and click Next.

Choose Destination Folder as per your own choice. By default it is (D:\Program Files (x86)\UGS\NX 6.0\) . After Destination Folder selection click on Next.During Licensing check that the port is set at your computer name. Like 28000@Your Computer Name.(Click here to Know your Host Name, Computer Name, Host-ID)Select the NX Language as your Operating System or Windows Language.

Then if you are ready to install the program click Install or if you want to modify any setting then click Back.

This will start the installation of the program on your Computer. Just wait till the installation wizard Install UG NX 6.

After installation finish run UG from program list or restart your computer and run UG from program list.


If you are installing from the image downloaded by torrent, you have to follow the installation steps provided with the crack, like copy the over cracked files etc.


The UG NX 6 will work fine in Windows 7 x64 bit as shown below.Hope that this will help you to run this great software in a great Windows.


Let me know if you have any issue during installation or running.


Want to make free worldwide calls. Try this

Installation and configuration of Solidworks 2007 or Solidworks 2008 on Windows 7 x64 bit

Dear CAD HELP CENTER readers welcome back after a long time with a new solution.


Today I will describe How to install and configure the Solidworks 2007 on Windows 7 x64 bit.


Earlier I have got some queried regarding the support of Solidworks 2007 in Windows 7. A lot of my friends are in confusion weather Solidworks 2007 will work or not in Windows 7 if they will upgrade their operating system. Officially only Solidworks 2009, Solidworks 2010 and Solidworks 2011 are support Windows 7 (32 & 64 bit). Solidworks 2007 and Solidworks 2008 are not supports Windows 7 officially.


But we need not to worry about the supports because there are a lot of ways to do this job.


Officially Solidworks 2007 & 2008 is not supported but we can install and use both versions in Windows 7 (32 & 64 bit).


Here we will see that how can we install & configure Solidworks 2007 in Windows 7 x64 bit.


First of all install Solidworks 2007 or 2008 like same as in Windows XP. (Remember that Solidworks 2007 or 2008 (32 bit) can be installed in both Windows 7 (32 & 64 bit). Solidworks 2007 or 2008 (64 bit) can be installed in only Windows 7 64 bit.

After installation you will find the Solidworks icon on the Desktop screen. Do not run the program just after installation because it will show the compatibility error and will not run.


Right Click on the Solidworks icon and select Properties as shown in below picture
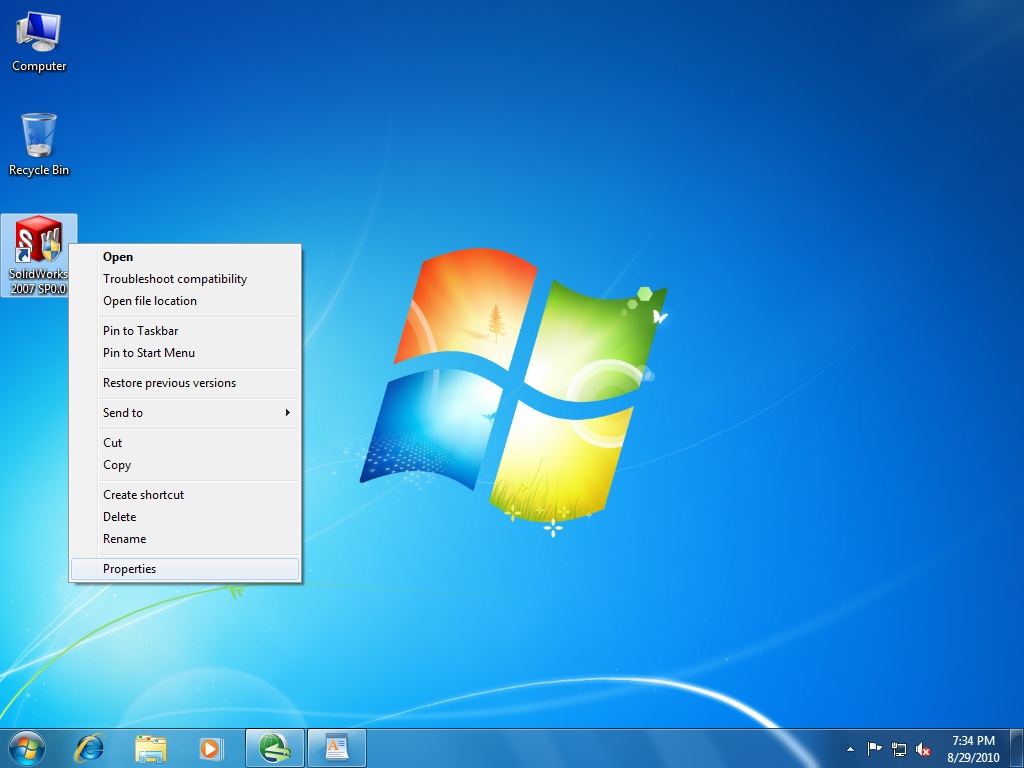
1. Click on Compatibility Tab.

2. Check mark Run this program in compatibility mode.

3. Select the Windows type you want for Compatibility Mode. Select Windows XP (Service Pack 2)

4. Then if you want this setting for all users then Click on the option Change Setting for all users.

5. Thereafter Click on Apply to apply this setting.

6. Then Click OK button.

After that run the Solidworks by double clicking on the Solidworks icon or right and select Open. This will run the program make Solidworks to run in compatible mode. In between the process the compatibility wizard can ask you to do this or not in that case select the next button. Compatibility wizard will show you the below screen after completion.
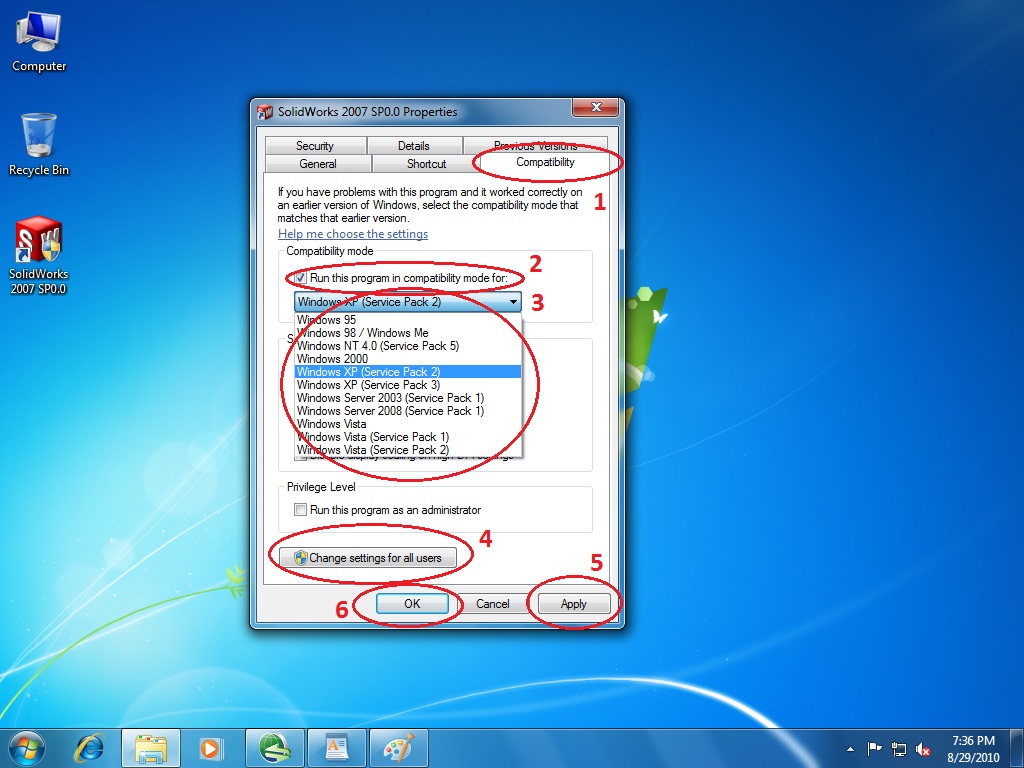
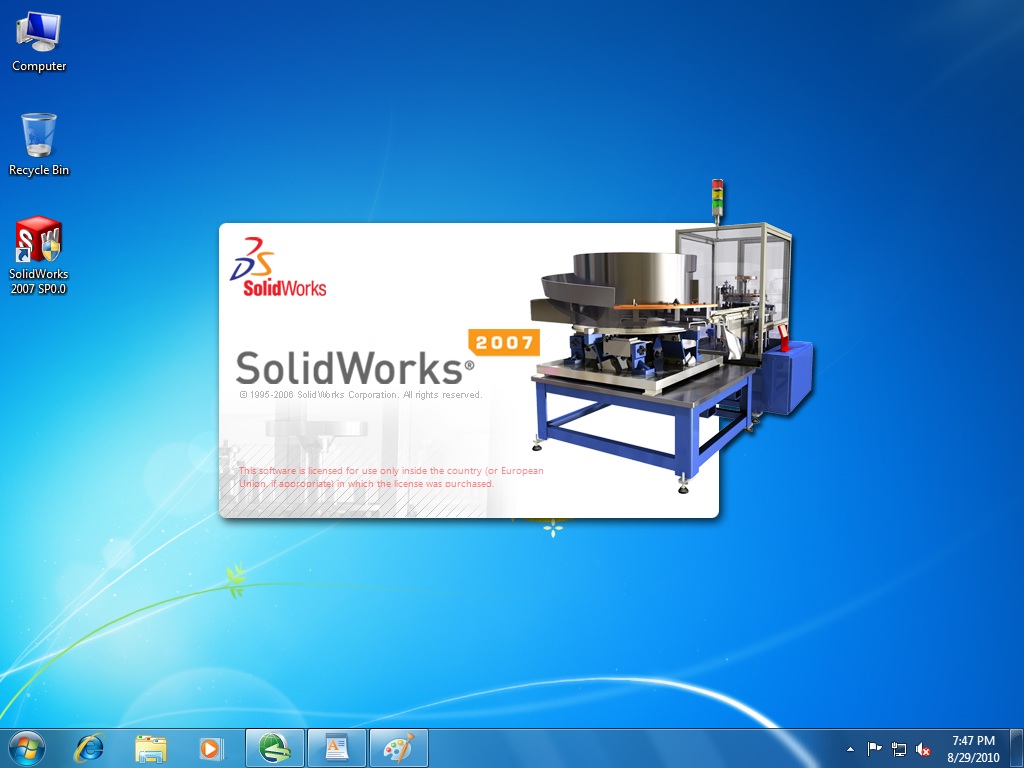
Now you can create or Open any Part or Assembly file. Click on New.


Select Part and then Click on OK button
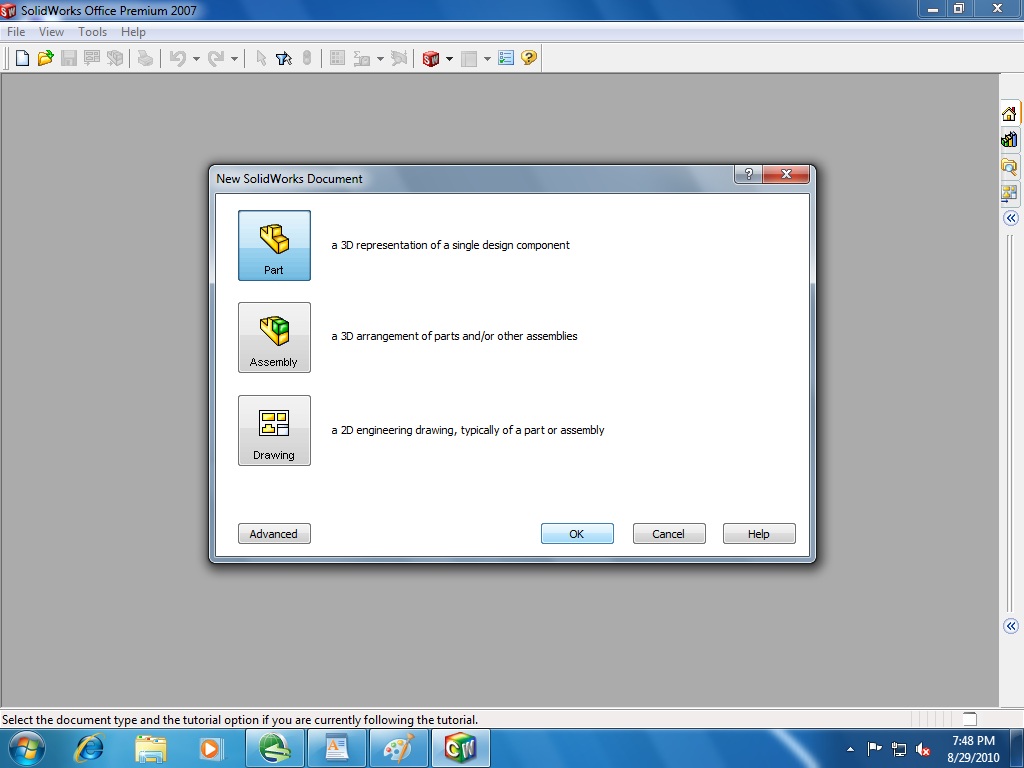
Now Solidworks 2007 or Solidworks 2008 is ready for use. Make whatever you wantSo if anyone using Windows XP or Windows Vista and want to upgrade their operating system to Windows 7 then you can upgrade. This will improve your working speed and performance.

If anyone has any issue or any other help then leave your comments

High pressure die casting simulation with ProCAST and QuikCAST

Na AutoGraph - full movie

Bunny - Full Length Telugu Movie - Allu Arjun - Gowri Mumjal


Step by Step Installation Guide of Solidworks 2011 x64 bit on Windows 7 Ultimate x64 bit

Dear CAD HELP CENTER readers after a long time I am here again to share my experience of installation of Solidworks 2011 Office Premium Service Pack 0.0 on my desktop computer in Windows 7 Ultimate x64 Edition Service Pack 1.


The same can be checked in the below picture.


Here again like my previous post for Installation of Solidworks 2010, I got the 30 Day trial copy of Solidworks 2011 x64 bit. So I decided to check whats new or spacial in Solidworks 2011 during installation.


Like installation of Solidworks 2010 the installation of Solidworks 2011 is very simple & fast. The process of installation may be shorter or lengthy on your machine as per hardware configuration. So just don't bother about the time it will take hardly 10-15 minutes.


After complete installation of Solidworks 2011 on my computer I realize that the overall process of installation is same as like Solidworks 2010 and very simple and didn't need any help, means we can say everything will complete automatically and we have to just click on the next button on every menu.


So I am describing the installation of Solidworks 2011 SP 0.0 x64 bit for single computer and the process is not include any license configuration from any server. This is a 30 day trial copy and need activation after 30 days. We can use it to learn whats new and advancements in the software and way to use commands.


If anyone facing the problem during License Configuration from server then the comments are most welcome and I will happy to do whatever I can do for the solution.


So lets start the standalone installation process of Solidworks 2011 x64 Edition on windows 7 Ultimate SP1 x64 .


For installation of Solidworks 2011 x64 Edition first of all you must have to have Windows XP x64 bit, Windows Vista x64 bit or Windows 7 x64 bit. You can find the minimum system requirement for Solidworks 2011 x64 bit here.

First of all mount the DVD in the drive and run the setup.exe.


This will show you the welcome screen of Solidworks Installation Manager. On welcome screen select Individual (on this computer) and click next button.

There after the installation manager will ask you to enter the serial no. information. Fill the blanks with the Serial keys provided with the DVD and click on next button.

Then it will check the internet connection for any updates available on the site (like Service Packs) during System Check. If you have internet connection then it will show you available updates. If you don't have internet connected then it will popup a warning massage and ask you to Retry or Cancel.


Just click on Cancel and continue the installation.

After click on the Cancel Button (this will stop the System Check process) and proceed to the next screen.


The next screen will show you the Summery. Here you can select which Products and Add-Ins you want to install. In this new release you will find a new Download Option to enable or disable the background downloader. If you don't have internet connection then you should disable this option via clicking on change button given on right side of this feature.


The products are detailed below:
In the Summery menu you can select the products by clicking on the


CHANGE given on the right upper corner. You can also Change the Installation Location and Toolbox/Hole Wizard Options here.

After doing all the setting as per your requirements click on Install Now Button given at lower right corner.


This will start the installation of selected products and you have to wait till completion. First it will start the installation of Required system components witch are available in the DVD and there after will install Solidworks 2011.


After completion of installation the Installation Manager will show the Installation is Complete message.


At the same time it will show me whats new in 2011, tell us how we can improve your installation experience and Solidworks Customer Experience Program.


Its on you what you want to do now. Select the option you want and click on the Finish button.
So here you can see the capabilities of Solidworks 2011 during 1st run of program. A very attractive and lovely design of Sports Car. The image shown during start up of Solidworks is alternate each time


In the last step Solidworks 2011 ask you to activate the product. Here select the activate now or activate latter option and click on finish. You can use the product for 30 Days without activation.


The below screen showing the about Solidworks.


Hope that this will help you all and if is there any query then feel free to share on

Dimension Of Bajaj Pulsar 200 Ns

Length
2017 mm
Height
1195 mm
Width
804 mm
Ground Clearance
167 mm
Saddle Height
804 mm
Kerb Weight
145 Kgs
Total Weight
Weight Carrying Capacity
Chassis
Pressed steel Perimeter Frame

Features Of Bajaj Pulsar 200 Ns

Fuel Efficiency

Fuel Efficiency
58 kmpl
Fuel Capacity
12 ltrs
Fuel Reserve
2 ltrs
Fuel Type
Petrol
Charging Duration

Safety

Brakes
Front-Petal Disc with floating caliper 280 mm Disc, Rear-Petal Disc with floating caliper 230 mm Disc
Suspension
Front-Telescopic Front Fork with Antifriction Bush Dia 37, Rear-Nitrox Mono Shock Absorber with piggy back gas canister

Drive Train

Clutch
Gear Box
6 Speed

Specification Of Bajaj Pulsar 200 Ns

Engine Type
Type SOHC - 4V - Liquid Cooled
Displacement
199.5 cc
Compression Ratio
Maximum Power
23.52 PS @ 9500 rpm
Maximum Torque
18.3 Nm @ 8000 rpm
Cylinder Bore
72 mm
Stoke
49 mm
Ignition
Independent spark control through ECU
Starting
Self Start
Wheel Base
1363 mm
Tyre Size
Front-100/80 – 17, 52 P, Tubeless, Rear-130/70 – 17, 61 P, Tubeless
Wheel Type
Front-10 spoke 2.5 x 17, Alloy, Rear-10 Spoke, 3.5 x 17, Alloy

Colors of Bajaj Pulsar 200 Ns

Bajaj Auto uses advanced technology to make Bajaj Pulsar very comfortable bike to offer an easier handling and control. Its advanced suspension system reduces jerks at rough road and enhances handling and control of the bike. Its large front disk brake and rear disk brakes (only at Bajaj Pulsar 200 Ns 220) stop the vehicle sooner and enhances safety. Its switches are also placed at very convenient place for easy access without distracting your eyes from road. The stance of the bike is just sporty and set it in the sporty bikes segment.


Overview of Bajaj Pulsar 200 Ns

Bajaj Pulsar 200 NS

Rs.84,096


Bajaj Pulsar 200 Ns Mileage, Average and Fuel Economy


Bajaj Pulsar 200 Ns is available with four variants which are powered by four different capacity engines so the performance and mileage they offers also differs. First one is the flagship variant of Pulsar which is powered by the 135cc, 4-stroke, air-cooled, 4-valve, single cylinder, SOHC (single overhead camshaft), DTS-i (digital twin spark ignition) petrol engine with five speed manual transmission gearbox. Now Bajaj Auto India is all set to introduce next generation Bajaj Pulsar 200 Ns 200 NS which would be powered by the 200 cc, SOHC, tri-spark liquid cooled petrol engine with six-speed manual transmission gearbox. The upcoming variant of Bajaj Pulsar 200 Ns offers an impressive mileage of 58 kmpl while driving at a consistent speed of 55 kmph.


The flagship Bajaj Pulsar 200 Ns comes loaded with 150cc, 4-stroke, Air-cooled, DTS-i (Digital Twin Spark Ignition) petrol engine. The Bajaj’s own patented DTS-i technology that offers faster and better combustion of fuel which results excellent fuel economy. This variant of Bajaj Pulsar 200 Ns offers mileage 56.5kmpl in urban roads while on highway it offers 65kmpl mileage. Third one is the more powerful variant of Bajaj Pulsar 200 Ns which is powered by the 178.6cc, 4-stroke, air-cooled, DTS-i (Digital Twin Spark Ignition) petrol engine with five speed manual transmission gearbox. This variant offers mileage 45.8kmpl mileage in city while on highway it gives 55.2kmpl. Another one is the 220cc version of Bajaj Pulsar 200 Ns which is powered by the 220cc, 4-stroke, Oil-cooled DTS-i petrol engine with five speed manual transmission gearbox which offers good engine performance but the mileage of this variant is bit lower. This variant of Bajaj Pulsar 200 Ns offers mileage around 38kmpl in urban traffic while on highway it offers 47kmpl mileage.

Bajaj Pulsar 200 Ns Pick up

We just mentioned that Bajaj Pulsar 200 Ns 200 NS houses a 200cc, 4 stroke, liquid cooled, 4 valve, single cylinder, SOHC (Single Overhead Camshaft), Digital Tri-Spark (Three spark plug technology) petrol engine with six speed manual transmission gearbox that generates 23.52 PS of top output power at 9500 RPM and pumps out 18.3 Nm of top torque at 8000 RPM that synonyms to great performance with superb acceleration. The tri-spark technology which is formulated by using three spark plugs for optimum combustion, resulting in high performance, greater mileage, low emission and excellent acceleration. It is the first time that any of bike across the globe uses three spark plugs on a single cylinder engine.


As we already discussed that Bajaj Pulsar 200 Ns 135 is powered by the 134.66cc, 4-Stroke, Air-Cooled, 4-Valve, Single Cylinder, SOHC (Single Overhead Camshaft), DTS-i (Digital Twin Spark Ignition) petrol engine with five speed manual transmission gearbox that produces 13.5PS of maximum power at 9000rpm with 11.4Nm of maximum torque at 7500rpm that results excellent engine performance with excellent acceleration. The all new 4-Valve DTS-i engine ensures faster and efficient fuel combustion that results increased acceleration, engine performance and increased fuel efficiency. This 134.66cc power-plant makes Bajaj Pulsar 200 Ns 135 able to cross the 60kmph mark in just 5.8 seconds and makes it able to touch the top speed mark of 106.8kmph.


Bajaj Pulsar 200 Ns is available with four different powered variants that delivers different level of engine performance and acceleration. The flagship variant of Bajaj Pulsar 200 Ns which is powered by the 150cc, 4-stroke, Air-Cooled, DTS-i, petrol engine with Bajaj’s own patented ExhausTEC (Torque Expansion Chamber) that improves engine torque at low revs that results excellent acceleration and pick up. This variant of Bajaj Pulsar 200 Ns can cross 60kmph mark in just 5.6 seconds and it can touch the top speed mark of 111kmph.


Third one is the 180cc version of Bajaj Pulsar 200 Ns which is powered by the more powerful engine. It is equipped with 178.6cc, 4-stroke, Air-cooled, DTS-i petrol engine with five speed manual transmission gearbox and with company’s own patented ExhausTEC (Torque Expansion Chamber) technology. Acceleration of this variant is higher than the flagship variant and it can cross the 60kmph mark in just 5.08 seconds and it can touch the top speed mark of 115kmph.


And the top end variant of Bajaj Pulsar 200 Ns which is equipped with more powerful engine in comparison to rest two variants offers better acceleration in comparison to other two. This variant of Bajaj Pulsar 200 Ns is equipped with the more powerful 220cc, 4-stroke, Oil-cooled, DTS-i petrol engine with five speed manual transmission gearbox and the ExhausTEC (Torque Expansion Chamber) technology. This variant of Bajaj Pulsar 200 Ns offers excellent acceleration so that the bike can cross the 60kmph mark in just 3.7 seconds and it can touch the top speed mark of 118.7kmph.Colors of Bajaj Pulsar 200 Ns

Bajaj Auto uses advanced technology to make Bajaj Pulsar very comfortable bike to offer an easier handling and control. Its advanced suspension system reduces jerks at rough road and enhances handling and control of the bike. Its large front disk brake and rear disk brakes (only at Bajaj Pulsar 200 Ns 220) stop the vehicle sooner and enhances safety. Its switches are also placed at very convenient place for easy access without distracting your eyes from road. The stance of the bike is just sporty and set it in the sporty bikes segment.

Bajaj Pulsar 200 Ns Looks

Appearance and look is the most important part of any bike that falls in this category and Bajaj Pulsar 200 Ns never disappoints. The front appearance of this bike is much impressive and it looks like any high end sports bike. Its aggressive-masked fairing wolf-eyed projector headlamps and large 15litre petrol tank with larger tank shrouds makes its appearance very aggressive. LED tail lamps, LCD digital speedo and tacho meters, alloy wheels and all black engine adds more style to its appearance. The 220cc version of Bajaj Pulsar 200 Ns looks more aggressive and impressive with its stylish rear view mirrors which are mounted on the front fairing mask. The six-spoke alloy wheels, stylish body panels, clear lens indicators, new 3D graphics and revised clips on handle bars make its overall look very impressive.


The all new Bajaj Pulsar 200 Ns 135 comes with newly designed sporty look that makes it appearance very sporty and stylish. The headlamp of the bike is same like XCD Sprint concept. The newly designed fuel tanks and air-scoops makes its appearance like XCD Sprint. The Black Matt Finish Mag Alloy Wheels, Digital LCD (Liquid Crystal Display) console meters, LED Tail Lamps, Sharply Styled Turn Indicators, Sporty Split Seats, Split Grab Rails and Sporty Mud Guards makes the appearance of Bajaj Pulsar 200 Ns 135 sporty and much impressive.

Bajaj Pulsar 200 Ns Dimensions

The dimensions of Bajaj Pulsar 200 Ns are length 2035mm, 750mm in width and height 1165mm. The wheelbase of 150cc version of Bajaj Pulsar 200 Ns is 1320mm while the wheelbase of 180 and 220 version of Bajaj Pulsar 200 Ns are 1345mm and 1350mm respectively. The kerb weight of 150 and 180 version of Bajaj Pulsar 200 Ns is 143kg while the kerb weight of 220cc version of Bajaj Pulsar 200 Ns is 152kg. The ground clearance of the bike is 165mm.

How comfortable is Bajaj Pulsar 200 Ns

Bajaj uses the newer generation of technology to make Bajaj Pulsar 200 Ns as a most comfortable bike. It is loaded with number of advanced features that offers ultimate comfort and driving experience with Bajaj Pulsar 200 Ns. These comfy features are Digital Fuel Guage, Self-Start, Tacho-Meter, Digital Trip-Meter and Speedometer, Low-Fuel Indicator, Low-Oil Indicator, Low Battery Indicator, Wide and Comfortable Step-Up seats. Tubeless tyre is another feature that offers tension free comfortable off-road riding.


Digital LCD (Liquid Crystal Display) console Speedometer, Fuel Guage, Tachometer and Trip Meter offers better vision to these meters and enhances comfortness. Some other features that offers comfortable riding experience with Pulsar 135 are Electric Start with Auto Choke, Telescopic Front and 5-step Adjustable Nitrox Suspension at rear, Twin Pilot Lamp and Pass Switch, Front Disc Brakes for efficient braking.

Bajaj Pulsar 200 Ns Tyres

All variants of Bajaj Pulsar 200 Ns come with the light weight alloy wheels that not only increase the bike’s overall performance but also offers stylish look. The flagship variant of Bajaj Pulsar 200 Ns comes with 90/90 X 17 front alloy wheels and 100/90 X 17 rear alloy wheel. While the 180 and 220 variants of Bajaj Pulsar 200 Ns comes with 90/90 X 17 front alloy wheel with 120/80 rear alloy wheel. All variants of Bajaj Pulsar 200 Ns are packed with tubeless tyres that offer safe and stress free riding experience at off-road conditions. Its wide tyres make the handling of the bike easier and also reduce the chance of skid out of control in case of hard braking and enhance safety. But such tyres also affect the mileage of the bike and we can say it’s another reason that reduces the fuel economy of the 180 and 220 version of Bajaj Pulsar 200 Ns.

Engine of Bajaj Pulsar 200 Ns

The next generation Bajaj Pulsar 200 Ns 200 NS will be powered by the 200cc, 4-stroke, liquid-cooled, 4-valve, single cylinder, SOHC (Single Overhead Camshaft), digital triple spark ignition petrol engine. The engine will be integrated with six-speed manual transmission gearbox. The 200cc tri-spark petrol engine that delivers 23.52 PS of top output power at 9500 RPM and 18.3 Nm of peak output torque at 8000 RPM. Bajaj Pulsar 200 Ns 200 NS will be the world’s first bike which will be affixed with triple spark technology on single cylinder engine.


Bajaj Pulsar 200 Ns 135 is equipped with the 134.66cc, 4-stroke, air-cooled, 4-valve, single cylinder, SOHC (Single Overhead Camshaft), DTS-i (Digital Twin Spark Ignition) petrol engine with five speed manual transmission gearbox. This 134.66cc power-plant produces 13.5PS of maximum power at 9000rpm with 11.4Nm of maximum torque at 7500rpm. The Bajaj Pulsar 200 Ns 135 is the world’s first bike which is loaded with the 4-Valve DTS-i technology which is designed for better engine performance in comparison to equivalent 2-valve engine. This 4-valve engine has 2-intake and 2-exhaust valves that improve the intake and exhaust process of the bike. It also enhances the induction of charge (air-fuel mixture) and also the evacuation of all burnt gases and ensures faster, cleaner and efficient combustion that results better engine power, performance and acceleration with increased fuel efficiency. The Bajaj Pulsar 200 Ns 135 is also loaded with the company’s own patented DTS-i (Digital Twin Spark Ignition) technology that ensures better combustion that results increased engine performance with better fuel efficiency.


Bajaj Pulsar 200 Ns is available with four different capacities engines that delivers different level of engine power and performance. The flagship variant of Bajaj Pulsar 200 Ns which is equipped with the 149.01cc, 4-stroke, Air-Cooled, DTS-i, petrol engine with five speed manual transmission gearbox. The company’s patented ExhausTEC (Torque Expansion Chamber) technology improves engine torque that results better engine performance. This engine produces 14.09PS of maximum power at 8500rpm with 12.76Nm of maximum torque at 6500rpm.


Third variant of Bajaj Pulsar 200 Ns is powered by the more powerful engine and it is equipped with 178.6cc, 4-stroke, Air-cooled, DTS-i, petrol engine with five speed manual transmission gearbox. This engine delivers better engine performance in comparison to the flagship variant of Bajaj Pulsar 200 Ns and it produces 17.02PS of maximum power at 8500rpm with 14.22Nm of maximum torque at 6500rpm.


And the top end variant of Bajaj Pulsar 200 Ns is powered by the more powerful engine and it is equipped with 220cc, 4-stroke, oil-cooled, DTS-i petrol engine with five speed manual transmission gearbox that produces 21.04PS of maximum power at 8500rpm with 19.12Nm of maximum torque at 7000rpm. This variant of Bajaj Pulsar 200 Ns delivers better engine power, performance and acceleration in comparison to its lower end variants. Only this variant of the bike has silver coloured engine which draw a line among the variants.

On Road Control and handling of Bajaj Pulsar 200 Ns

The homegrown bike maker installed many innovative features in next generation Pulsar 200 NS. To provide better handling and braking system company installed better suspension system and adds disc brakes at both front and rear ends make it one of the best.


Bajaj Auto uses advanced technology to make Bajaj Pulsar 200 Ns very comfortable bike to offer an easier handling and control. Its advanced suspension system that reduces jerks at rough road and enhances handling and control of the bike. Its large front disk brakes and rear disk brakes (only at Bajaj Pulsar 200 Ns 220) stops the vehicle sooner and enhances safety. Its switches are also placed at very convenient place for easy access without distracting your eyes from road.

Riding Experience - Suspension of Bajaj Pulsar 200 Ns

The newly reported next generation Bajaj Pulsar 200 Ns 200 NS will come affixed with a better and reliable suspension system to provide an overall driveability experience to its user. The bike will adorn a nitrox mono-shock suspension at rear and telescopic fork in front.


All variants of Bajaj Pulsar 200 Ns are packed with advanced suspension system that reduces the jerks at rough roads and offers comfortable riding experience.


The front wheel of Bajaj Pulsar 200 Ns 135 is equipped with the new Telescopic Fork with Anti-Friction Bush (130mm Stroke) suspension system with the Nitrox, Trailing Arm with Co Axial Hydraulic cum Gas Filled Adjustable Shock Absorbers and Triple Rate Coil Spring.


The flagship variants of Bajaj Pulsar 200 Ns is packed with the 135mm stroke, telescopic shock absorbers at front and triple rated spring, 5-way adjustable with 105mm travel nitrox shock absorber at rear. The 180cc version of Bajaj Pulsar 200 Ns is loaded with the 130mm stroke, telescopic shock absorber at front with triple-rated spring, 5-way adjustable with 101mm travel nitrox-shock absorber at the rear. While the top end variant of Bajaj Pulsar 200 Ns is packed with telescopic, 130mm shock absorber at front wheel with the 90mm nitrox shock absorber at the rear wheel.

Bajaj Pulsar 200 Ns Pros

Tri-spark technology for the first time in single cylinder bike, fuel economy of 58 kmpL at a consistent speed of 55 kmph, superb braking system, energized by the 200 cc.

Bajaj Pulsar 200 Ns Cons

Unobserved.

Step by Step Installation Process of UG NX 8.0 x64 bit in Windows 7 Ultimate x64 bit.


Dear CAD HELP CENTER friends Wish you all a very very Happy New Year which is 2012. Hope that everything is fine at your ends. You all are preparing or making different plans for new year celebration. Its a long time that I have posted any new solution or made any reply to all my friends. I feel very sorry for this, but I think you can understand my situations. I was very much busy.


Now I got some time and here with a new solution or we can say a new reason to calibrate new year with UG NX 8.0 or you can say this is the gift from CAD HELP CENTER for new year.

So friends what you are waiting just follow this guide which can start your new year with UG NX 8.0


As you all know that Siemens PLM Software is proudly introduced NX 8 in market in September 2011. From the same day everyone is in search to get this latest NX 8 with enhanced capabilities of HD3D tools & enhance Synchronous Technology and now I have got this and hope so you also have got it. The new version of UG NX 8.0 is available for both Windows x32 bit and x64 bit platforms.

The full package is a combined bundle of multi modules includes Solid Modeling, Sheet metal Designing, Surface Designing, Digital Mock-Up (DMU), Kinematics, Finite Element Analysis, Machining, Circuit Designing, Mechatronics Concept Designer and many more.....


You are at right place if you are searching to get help regarding installation of Unigraphics NX 8.0 or can say Unigraphics NX 8. This guide will help you to install and configure license file for UG NX 8 x64 bit on Windows 7 Ultimate x64 bit. So get ready to know how to install or configure UG NX 8.0 in Windows 7 Ultimate x64 bit.


Here in this post I am describing my experience of installation of UG NX 8.0 x64 bit on my desktop computer in Windows 7 Ultimate x64 Edition Service Pack 1. First of all I want to share with you that whatever media I have got is saying that Files on this media are intended for use on 64 bit Windows XP, Vista and Windows 7 platform only. So this is conformed that this will not work on any 32 bit machine having Windows XP x32 bit, Windows Vista 32 bit or Windows 7 x32 bit. After complete installation of UG NX 8 x64 bit on my computer I realize that the overall process of installation is very easy and same as the earlier posted procedure for UG NX 7.0


So First of all mount the DVD in the drive and run the Launch.exe as shown above. This will Show you the NX 8.0 Software Installation menu as shown below. From here you can View Documentation, Install License Server, Install NX or can Get Composite Host ID.


Now click on Install NX. This will start the installation of Unigraphics NX 8 on your Computer or Laptop or Machine. Now you have to Choose Setup Language. The default language is English but you can select your choice.(Currently UG NX 8 is supporting Chinese Simplified & Traditional, English, French, German, Italian, Japanese, Korean, Russian and Spanish) This is only Setup Language.


Now you will see the Welcome to InstallShield Wizard for UG NX 8.0.


Now Click on Next Button. This will Show you Setup Type Menu.


Select Typical and Click on Next button. and you will see the Destination Folder Menu.


Keep the Destination Folder as it is and Click on Next button. This will show you Licensing Menu and ask you to Enter Server Name or a License File.


This will be like 28000@cad-pc for my Computer or 28000@Your Host Name for your computer. You can check your computer name Here. Then Click on Next button This will show you NX 8.0 Language Selection menu.


Select the Language in which you want to install the UG NX 8. This is the Language in which program will run after installation. English is Default one, you just select yours and then Click on Next Button.


After that the setup will ask you to review or change the Installation Setting. If the setting is OK then click on Install Button or if anything wrong then click back and repeat the above process to reset all.


After Clicking on Install Button the Setup will start Installing UGS NX 8.0.


After installing the Setup will show you the InstallShield Wizard Completed. If you want to see the Windows Installer Log then check mark the option and Click Finish or if you don't then without check mark Click on Finish.


Now you have to Configure your License File to run the UG NX 8.0, so for this you have to install License Server first and then you can do the License Configuration.


To install License Server for UG NX 8.0 you have to click on Install License Server as shown below.


This will start the installation of Unigraphics NX 8 License Server on your Computer or Laptop or Machine. Now you have to Choose Language for the Installation. The default language is English but you can select your choice from the available list.


Now Click on OK button and the Installation of License Server will begin and will show you the below Screen. Just Click on Next Button.


After this Setup will ask you for Destination Folder where you want to install the License Server. This is optional you can change this as per your choice or can keep the default. as shown below. After selection of folder click on Next button.


Setup will now ask you for the License File Location. Copy your License File on the Desktop and click on Browse button and select the License File copied by you on Desktop. Then click on Next button.


Now the License Server is ready to be installed. Just click on Install button as shown below.


The installation will begin and setup will copy the required file to the specified folder.


The installation will take around one minute (It depends on your computer/Workstation Hardware).

Click on the Finish button to finish the installation.


Now click on the Exit button on NX 8.0 Software Installation menu to finish the installation.


At this moment you have completed the NX 8.0 installation & License Server installation. If everything goes right the n you have to just Restart your computer. After restart try to launch UG NX 8.0 from the All Programs menu in Windows 7 by clicking on NX 8.0


If the installation & Licensing was fine then the UG NX 8.0 will start up and run.


If there is a problem in start up or any error line License Server Down or License Server not Started or License file in configured at wrong port etc.........in That case you have to reconfigure the License File & Server manually. For this go to the NX Licensing Tools and Click on Lmtools.


Now you have to run the lmtools.exe (You can do this by following methods)


Start->All Programs->Siemens NX 8.0->NX Licensing Tools->Lmtools

Start->Run->C:\Program Files (x86)\UGS\UGSLicensing\lmtools.exe

Go to the above shown file location and double click on lmtools.exe

Now follow the below precess to configure license services:

First of all you have to find that whether the License Server is running in background or Not? You can check this by going to the Stop/Reread Tab. If the license server is running then check-mark the Force Server ShutDown and click on Shut Down Server.


Now go to the Service/License File Tab and Select the option Configure using License File.


Select the License file from the location : C:\Program Files (x86)\UGS\UGSLicensing\ugs4.lic by clicking on Browse button.


Now again go to the Service/License File Tab and Select the option Configure using Services.


Now go to Start/Stop/Reread Tab.


Now click on Start Server Button and exit the lmtools.exe by clicking on the cross mark on upper right hand corner.

Now try to launch UG NX 8.0 from the All Programs menu in Windows 7 by clicking on NX 8.0


I hope this will help you to Install & Configure the UG NX 8.0 on your computer. If need any further help then leave your comments.


Or if you have downloaded a cracked or pirated software then you have to follow the installation & configuration procedure as described in the downloaded UG NX 8.0